Prototyping and building real-time web applications has never been as easy as it is today. There are many libraries that have taken away the complexity of utilizing WebSocket technology. In this tutorial, we will look at using Socket.io and JavaScript in conjunction with Express and Node to build an incredibly simple and minimal presentation slides app that let’s you update slides in real-time off of any internet connected device. Once completed, you can totally show it off at your next tech talk or lunch & learn.
The demo app for this tutorial is available at: github.com/nafeu/realtime-slides-tut and a demonstration video is available here.
Some things to note before we get started:
- This tutorial requires Node.js v7 or higher.
- We will try and use as little Socket.io code as possible. This means we won’t modify any configurations and will just use the library as it is right out of the box.
- We will add basic console logging to help debug and visualize the connection flow but these aren’t needed for the app the work.
- For simplicity’s sake, we will be writing on-page javascript inside our html files. In practice, our JavaScript would exist in different files and we would use a module bundler or build config system like webpack to bundle it all together in an appropriate fashion. We aren’t going to bother with that for now.
- We will use ES6 syntax on both the server and client.
The point of this tutorial is to show you how EASILY you can begin adding real-time interactivity as a part of the apps you build.
Let’s begin by creating a new directory for our project and a package.json file inside it:
mkdir realtime-slides-tut
cd realtime-slides-tut
touch package.json
Inside our package.json, let’s fill in some basic information:
{
  "name": "realtime-slides-tut",
  "version": "0.0.1",
  "description": "Real-time slides tutorial with Socket.io",
  "dependencies": {}
}
Now let’s install our dependencies:
npm install --save express socket.io showdown
- Express allows us to create the webserver and REST API needed to run our app
- Socket.io is the real-time engine (utilizing the WebSocket API)
- Showdown converts Markdown (a simple plain text formatting syntax) into HTML for us
The installation should generate a package-lock.json file and node_modules folder, these are just responsible for maintaining our dependencies.
Let’s get our server up and running. Create a server.js file and add in the following:
const express = require('express');
const http = require('http');
const app = express();
const server = http.Server(app);

// Configuration

server.listen(process.env.PORT || 8000, () => {
  console.log(`[ server.js ] Listening on port ${server.address().port}`);
});
Here we are using Express to instantiate an HTTP server and attaching it to an Express app. When we run it, the console.log( ... ) should show us which port the server is running on (we have set the default to port 8000).
Test it out by running node server.js and you should see the following output:
[ server.js ] Listening on port 8000
Every time we update our server.js file we will have to restart our server, that is pretty annoying so let’s use a tool called Nodemon, install it with npm install -g nodemon.
Make sure you’ve ended your original server process, open a new shell instance aside from your main one and run nodemon server.js. This way we can keep making changes to our files and the server will restart automatically for us.
Now we want to set up some basic views and routes. Let’s create a folder for our views and add show.html and edit.html:
mkdir views
touch views/show.html views/edit.html
Your project structure should look like this for the rest of the tutorial:
├── node_modules
├── package-lock.json
├── package.json
├── server.js
└── views
    ├── edit.html
    └── show.html
Now inside our show.html and edit.html files, add the following:
<h1>view: show</h1>
<h1>view: edit</h1>
Back in our server.js, let’s set up the routes so our server can send our users the correct html files based on which page they go to.
At the top, require the path module, then create a new section called Routes below our server configurations and add the following:
const express = require('express');
const http = require('http');
const path = require('path');
const app = express();
const server = http.Server(app);

// Configuration

server.listen(process.env.PORT || 8000, () => {
  console.log(`[ server.js ] Listening on port ${server.address().port}`);
});

// Routes

app.get('/', (req, res) => {
  res.sendFile(path.join(__dirname, 'views/show.html'));
});

app.get('/edit', (req, res) => {
  res.sendFile(path.join(__dirname, 'views/edit.html'));
});
For those who may be a bit unfamiliar with Express, don’t be thrown off by the routing code. app.get( ... ) handles a GET request to the specified endpoint and the code inside (req, res) => { ... } is where we decide how we want to handle that request. The res object allows us to administer a response.
Our goal is to do the following:
- User goes to
/(ie. performs a GET request tolocalhost:8000/) => respond with show.html - User goes to
/edit(ie. performs a GET request tolocalhost:8000/edit) => respond with edit.html
We want to build a clean path to our html files, we do this with path.join(__dirname, ... ). Then we use res.sendFile( ... ) to send the file at that specific path.
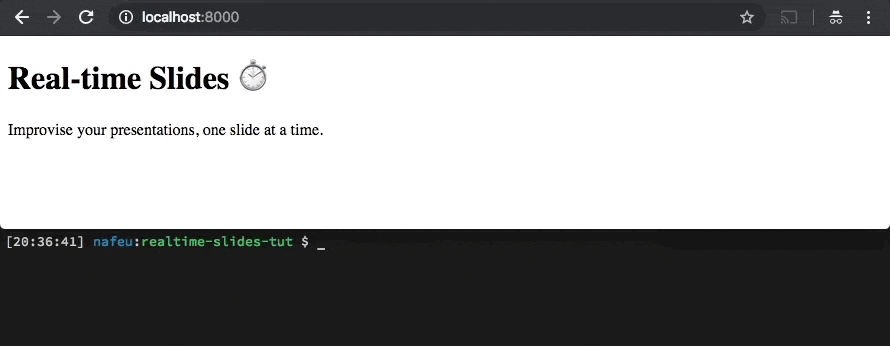
Now if we open a web browser to localhost:8000, we should see the following:

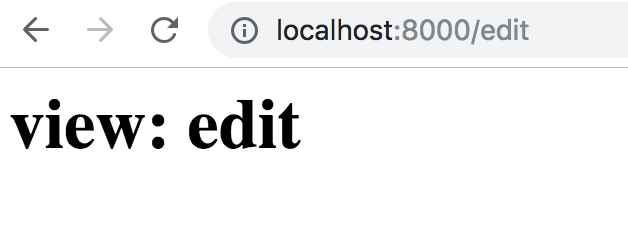
And if we go to localhost:8000/edit, we should have:
We can also test out our routes using curl like so:
$ curl localhost:8000/
<h1>view: show</h1>
$ curl localhost:8000/edit
<h1>view: edit</h1>
Now that our views and routes are set up, let’s get our WebSocket connections up and running.
In our server.js, require socket.io at the top and create an io object connected to our server. Then add a Socket Events section below our routes as follows:
const express = require('express');
const http = require('http');
const path = require('path');
const app = express();
const server = http.Server(app);
const io = require('socket.io')(server);

// Configuration

server.listen(process.env.PORT || 8000, () => {
  console.log(`[ server.js ] Listening on port ${server.address().port}`);
});

// Routes

app.get('/', (req, res) => {
  res.sendFile(path.join(__dirname, 'views/show.html'));
});

app.get('/edit', (req, res) => {
  res.sendFile(path.join(__dirname, 'views/edit.html'));
});

// Socket Events

io.on('connection', (socket) => {
  console.log(`[ server.js ] ${socket.id} connected`);

  socket.on('disconnect', () => {
    console.log(`[ server.js ] ${socket.id} disconnected`);
  });
});
We have now opened a WebSocket connection to localhost:8000 (this is the default since we didn’t choose otherwise). The io object is what will manage this connection from the server-side. Socket.io gives us a very straightforward server-side API for event handling.
io.on('connection', (socket) => { ... }) registers a handle for the connection event which is fired off once a client successfully connects. The socket object holds our line of communication with that one client.
So take a look at the following:
// Socket Events

io.on('connection', (socket) => {
  console.log(`[ server.js ] ${socket.id} connected`);

  socket.on('disconnect', () => {
    console.log(`[ server.js ] ${socket.id} disconnected`);
  });
});
What we are doing here is logging the id for a client once they’ve connected, then logging it again once they’ve disconnected. It will make a lot more sense once we start connecting and disconnecting ourselves, but before we can get this to work, our client needs to know how to connect, so let’s write our client-side code.
Open show.html and fill it with the following:
<!DOCTYPE html>
<html>
<head>
  <title>Real-time Slides Tutorial | Show</title>
  <script src="/socket.io/socket.io.js"></script>
</head>
<body>
  <h1>view: show</h1>
  <script type="text/javascript">

    const socket = io();

  </script>
</body>
</html>
An important thing to note here is how we are importing the client-side Socket.io library using <script src="/socket.io/socket.io.js"></script>. You might be curious, how can we link to this script from our project directory when we never took any steps to put it there in the first place? We never downloaded socket.io.js or placed anything of the sort into a /socket.io directory.
The reason we can import the library like this is because, by default, Socket.io is configured to serve it at this path: /socket.io/socket.io.js. This is done inside our server.js file during the following step:
const io = require('socket.io')(server);
This is super useful when building simple apps like ours but can also be turned off if needed. We will keep it as is for now.
Look back at the JavaScript in our show.html file:
  <script type="text/javascript">

    const socket = io();

  </script>
Here we create an instance of the main client-side Socket.io library with const socket = io();. By default, it creates a WebSocket connection to localhost:8000 (since we did not specify otherwise). Recall that we had opened one for localhost:8000 initially in our server.js, that is what it is connecting to.
* Note: there is no significance to port 8000, if your server was listening on other arbitrary ports like 4000 or 3333 then the default WebSocket connections would have opened on localhost:4000 or localhost:3333 respectively.
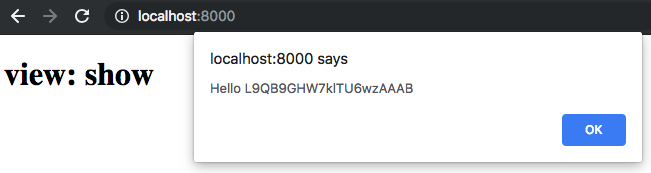
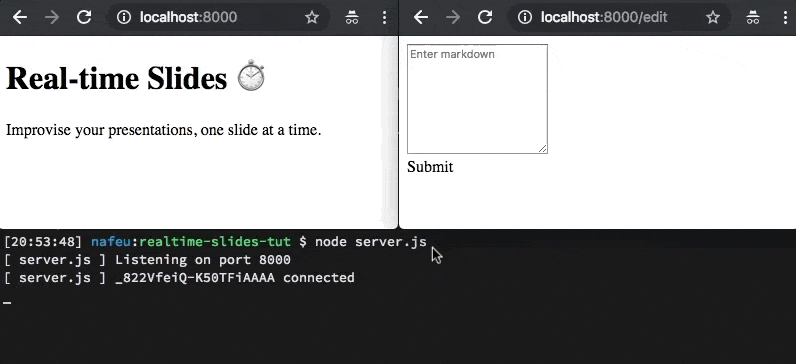
Now if we open localhost:8000 in a web browser and then look back to our server process, we should see something like this:
The generated id will be unique for every connected client. Try opening localhost:8000 in multiple browser tabs and you will see a bunch of different connection ids logged.
Now let’s begin implementing the logic pertaining to presentation slides.
We can start by understanding how to handle socket events on the client.
Within the on-page script on show.html, add the following:
  <script type="text/javascript">

    const socket = io();

    socket.on('update slide', () => {
      alert("UPDATE SLIDE");
    });

  </script>
This adds a handle for a new event type we create called update slide. We want to have an alert pop up on screen anytime we receive an update slide event from our socket connection.
Now that we have that ready, let’s figure out how we can actually fire that event within our server.
Go back to the Socket Events section in our server.js, and underneath our first console.log() add socket.emit('update slide') like so:
// Socket Events

io.on('connection', (socket) => {
  console.log(`[ server.js ] ${socket.id} connected`);

  socket.emit('update slide');

  socket.on('disconnect', () => {
    console.log(`[ server.js ] ${socket.id} disconnected`);
  });
});
This is temporary and just for us to demonstrate how the event emission process works between the Socket.io server and client. What this will do is fire an update slide event directly to any client that connects. It occurs in this order:
- A client establishes a WebSocket connection to
localhost:8000(ie. a single user opens our page). - The server-side
ioobject handles that connection and gets access to it’s relatingsocketobject. - The server-side
ioobject emits anupdate slideevent to that client through thesocketobject. - The client receives that
update slideevent and shows analert.
Open localhost:8000 in your browser to try it out, you should see the alert.
Now let’s modify it a bit so we can send some data along with the events we emit.
// Socket Events

io.on('connection', (socket) => {
  console.log(`[ server.js ] ${socket.id} connected`);

  socket.emit('update slide', `Hello ${socket.id}`);

  socket.on('disconnect', () => {
    console.log(`[ server.js ] ${socket.id} disconnected`);
  });
});
Here in socket.emit('update slide', ... ) we are sending `Hello ${socket.id}` as a payload along with our update slide event.
Update the JavaScript in show.html as so:
  <script type="text/javascript">

    const socket = io();

    socket.on('update slide', (data) => {
      alert(data);
    });

  </script>
In socket.on('update slide', (data) => { ... }) we are grabbing the payload that we’ve sent, I’ve named it data here but we can name it however we wish within the relevancy of the data that is being transmitted.
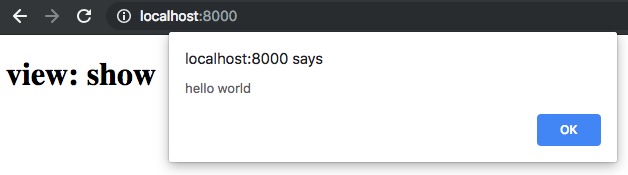
Now if we open localhost:8000 we should see the following alert message (please note that the generated id will be different for you):
Pretty nifty huh? This rough demonstration shows us how we can begin pushing data and firing events between the server and the client. I highly recommend that you bookmark Socket.io’s Emit Cheatsheet for future reference.
For the purpose of this tutorial, we don’t have to understand all forms of emit/broadcast interaction between the server and client(s), but it is important to understand the following:
- On the server,
io.emit( ... )emits the event to ALL connected clients - On the server and client,
socket.emit( ... )emits the event between a specific client and the server.
Now what if we want to trigger a real-time action (like broadcasting a message to all connected clients) using an HTTP request?
Go back to our server.js file and update our Socket Events like so:
// Socket Events

io.on('connection', (socket) => {
  console.log(`[ server.js ] ${socket.id} connected`);

  socket.on('disconnect', () => {
    console.log(`[ server.js ] ${socket.id} disconnected`);
  });
});

function updateSlide(html) {
  io.emit('update slide', html);
}
Here we removed that socket.emit( ... ) code and added a new helper function updateSlide(html) which emits an update slide event to ALL clients along with given html as the payload.
Now add an API section underneath the Socket Events section and fill it in with the following:
// API

app.get('/api/updateSlide', (req, res) => {
  console.log(`[ server.js ] GET request to 'api/updateSlide' => ${JSON.stringify(req.query)}`);

  const { html } = req.query;

  if (html) {
    updateSlide(html);
    res.status(200).send(`Received 'updateSlide' request with: ${html}\n`);
  } else {
    res.status(400).send('Invalid parameters.\n');
  }
});
Here is what is going on:
- The endpoint
/api/updateSlidehandles a GET request. - In the handler, if the query params contain the var
html(ie.localhost:8000/api/updateSlide?html=hello%20world) then we call theupdateSlide(html)function with the given value. - That in turn calls
io.emit('update slide', html)with our relevant data.
Let’s see this in action! Keep a browser window open to localhost:8000 and in your shell, put in curl localhost:8000/api/updateSlide?html=hello%20world (alternatively you can just open localhost:8000/api/updateSlide?html=hello%20world in another browser window)
In your shell you should see:
$ curl localhost:8000/api/updateSlide?html=hello%20world
Received 'updateSlide' request with: hello world
In your server’s process you should see:
[ server.js ] GET request to 'api/updateSlide' => {"html":"hello world"}
And in your browser window you should see:
Isn’t that awesome? We can use our existing knowledge of REST APIs to add a layer of real-time interaction to our app. It should be noted that you can generate requests using vanilla JavaScript without any extra libraries, so if you wanted to create a kind of remote control app to interact with a real-time interface, that remote control app doesn’t even need to use Socket.io, it just has to hit the right API with the right HTTP requests. Neat!
Anyways, back to our app. Let’s get our actual page content to update according to these requests. Go to the show.html file and update the entire body (including the JavaScript) as so:
<body>
  <div id="slide">
    <h1>Real-time Slides ⏱</h1>
    <p>Improvise your presentations, one slide at a time.</p>
  </div>
  <script type="text/javascript">

    const socket = io();

    socket.on('update slide', (html) => {
      document.querySelector('#slide').innerHTML = html;
    })

  </script>
</body>
We’ve added a div with id slide and some basic html to create a presentation slide. In our JavaScript we updated the update slide handler to select our div#slide and replace it’s inner html with whatever new html comes in from the server.
Now with the browser window open to localhost:8000, when we run those similar curl commands, we should get:

Sweet! We are slowly getting there. We don’t actually ever want to manually type html to update our page, so it would be cool if we could type in something much more common and human readable which can then turn into html for us, something familiar like Markdown.
For this we need a library to do the actual Markdown processing for us, this is where we use Showdown.
If you aren’t familiar with Markdown, here is a quick example. It takes an input like this:
#Hello World
Let's build a real-time app!
and turns it into:
<h1>Hello World</h1>
<p>Let's build a real-time app!</p>
This saves us from having to write all the markup language by hand.
Let’s go to our server.js and do some simple modifications to incorporate Showdown. At the top, require Showdown and then create a converter object as shown:
const express = require('express');
const http = require('http');
const showdown = require('showdown');
const path = require('path');

const app = express();
const server = http.Server(app);
const io = require('socket.io')(server);

const converter = new showdown.Converter();
The converter object does what you would expect, it takes Markdown and converts it into html. We also did a bit of reordering here to make the require statements easier to read.
Now go to the Socket Events section and update the updateSlide(html) function to updateSlide(markdown) as follows:
// Socket Events

io.on('connection', (socket) => {
  console.log(`[ server.js ] ${socket.id} connected`);

  socket.on('disconnect', () => {
    console.log(`[ server.js ] ${socket.id} disconnected`);
  });
});

function updateSlide(markdown) {
  io.emit('update slide', converter.makeHtml(markdown));
}
And for the last modification to our entire server.js file, update the API section like so:
// API

app.get('/api/updateSlide', (req, res) => {
  console.log(`[ server.js ] GET request to 'api/updateSlide' => ${JSON.stringify(req.query)}`);

  const { markdown } = req.query;

  if (markdown) {
    updateSlide(markdown);
    res.status(200).send(`Received 'updateSlide' request with: ${markdown}\n`);
  } else {
    res.status(400).send('Invalid parameters.\n');
  }
});
With our existing code, how would we get the following to show up on our screen?
<h1>Hello World</h1>
<p>Let's build a realtime app!</p>
We know that this is generated by #Hello World\nLet's build a real-time app! using Markdown, so let’s safely encode that into our request localhost:8000/api/updateSlide?markdown=...
For URL Percent-encoding:
- hash:
#is%23 - space is
%20 - newline:
\nis%0A - apostrophe:
'is%27 - hyphen:
-is%2D
So a GET request to our api endpoint using curl like this should work:
curl localhost:8000/api/updateSlide?markdown=%23Hello%20World%0ALet%27s%20build%20a%20real%2Dtime%20app!
Let’s try it out:
Voila! We are able to fully update our “slide” with new html derived from simple Markdown.
OBVIOUSLY we are never going to encode URLs manually, JavaScript can do that for us using the built-in encodeURIComponent() function. We just have to worry about writing Markdown.
Now that our show view is working accordingly, let’s work on our edit view. Open up edit.html and replace it’s content with the following:
<!DOCTYPE html>
<html>
<head>
  <title>Real-time Slides Tutorial | Edit</title>
</head>
<body>
  <textarea rows="8" placeholder="Enter markdown"></textarea>
  <div id="submit-button" onclick="handleSubmit()">Submit</div>

  <script type="text/javascript">
    const textarea = document.querySelector("textarea");

    function sendUpdateSlideRequest(markdown) {
      const { protocol } = window.location;
      const url = `${protocol}/api/updateSlide?markdown=${encodeURIComponent(markdown)}`;
      const xhttp = new XMLHttpRequest();
      xhttp.open("GET", url, true);
      xhttp.send();
    }

    function handleSubmit() {
      if (textarea.value.length > 0) {
        sendUpdateSlideRequest(textarea.value);
      }
      textarea.value = "";
    }

  </script>
</body>
</html>
Here is a quick breakdown of that code:
- We have a simple
textareawhere we can enter our Markdown - We’ve also got a
divwith the idsubmit-buttonthat once clicked will trigger thesendUpdateSlideRequest(markdown)helper function - The
sendUpdateSlideRequest(markdown)function generates a GET request to the endpointapi/updateSlidewith the appropriately encoded data in the URL params.
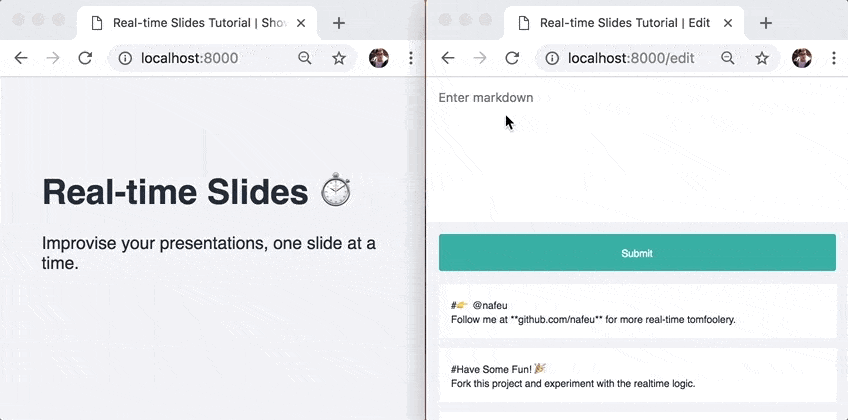
Now if we open one browser window to localhost:8000 and one to localhost:8000/edit, this is what we get:
Functionality wise, we are almost done! We just need to add some additional features and styling for polish.
Let’s add the ability to pre-load a slide deck and retain submitted slides in our edit view.
Open up edit.html and modify it as so:
<!DOCTYPE html>
<html>
<head>
  <title>Real-time Slides Tutorial | Edit</title>
</head>
<body>
  <textarea rows="8" placeholder="Enter markdown"></textarea>
  <div id="submit-button" onclick="handleSubmit()">Submit</div>
  <div id="deck"></div>
  <script type="text/javascript">
    const textarea = document.querySelector("textarea");
    const deck = document.querySelector("#deck");
    const slides = [
      '#Have Some Fun! 🎉\nFork this project and experiment with the real-time logic.',
      '#Clever Libraries 🛠\nPowered by Express.js, Socket.io, Showdown and some sweet Vanilla JS',
    ];

    function sendUpdateSlideRequest(markdown) {
      const { protocol } = window.location;
      const url = `${protocol}/api/updateSlide?markdown=${encodeURIComponent(markdown)}`;
      const xhttp = new XMLHttpRequest();
      xhttp.open("GET", url, true);
      xhttp.send();
    }

    function updateDeck() {
      deck.innerHTML = "";
      slides.forEach((markdown) => {
        const slideNode = document.createElement("p");
        slideNode.innerText = markdown;
        slideNode.onclick = () => {
          sendUpdateSlideRequest(markdown);
        }
        deck.appendChild(slideNode);
      })
    }

    function handleSubmit() {
      if (textarea.value.length > 0) {
        slides.unshift(textarea.value);
        updateDeck();
        sendUpdateSlideRequest(textarea.value);
      }
      textarea.value = "";
    }

    (() => {
      updateDeck();
    })();
  </script>
</body>
</html>
We aren’t doing anything particularly clever here, so I’ll let you debunk how the additional code works.
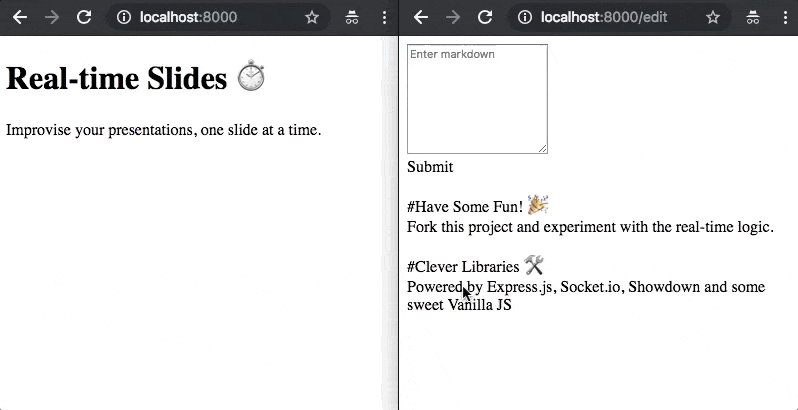
In layman’s, we are storing a set of slide data (like a deck) and generating some divs out of that data. Clicking on those divs submits that slide again to our API so it can update what is visible on the show view. Every time we submit a new slide using the text field, that data gets added into our deck. This is what we get:
Now for some finishing touches!
Add the following styles to your show.html file:
  <style type="text/css">
    body {
      background-color: #f1f2f6;
      color: #222f3e;
      font-family: 'Helvetica', 'Arial', sans-serif;
    }

    h1, h2, h3, h4, h5, p {
      margin-bottom: 0px;
    }

    #slide {
      margin: auto;
      height: 60%;
      width: 80%;
      position: fixed;
      top:0;
      bottom:0;
      left:0;
      right:0;
      font-size: 5vmin;
      display: inline-block;
    }
  </style>
And finally, add the following styles to your edit.html file:
  <style type="text/css">
    body {
      background-color: #f1f2f6;
      color: #222f3e;
      font-family: 'Helvetica', 'Arial', sans-serif;
      font-size: 1.25em;
      width: 100%;
      margin: 0;
    }

    *:focus {
      outline: none;
    }

    textarea {
      width: 100%;
      border: none;
      margin-bottom: 20px;
      resize: none;
      padding: 25px;
      font-size: 1.25em;
    }

    #submit-button, #deck p {
      cursor: pointer;
    }

    #submit-button:active, #deck p:active {
      opacity: 0.5;
    }

    #submit-button {
      padding: 25px;
      text-align: center;
      margin: 0px 25px 25px 25px;
      border-radius: 5px;
      background-color: #01a3a4;
      color: white;
    }

    #deck {
      padding: 0px 25px 0px 25px;
    }

    #deck p {
      background-color: white;
      padding: 25px;
      border-radius: 5px;
      margin-top: 0px;
    }
  </style>
And you finish off with:
Hope you have enjoyed the tutorial! If you have any questions, feel free to comment below.
The demo project is available at github.com/nafeu/realtime-slides-tut so check it out, fork it and have some fun! I’ve added instructions on how to get it up and running using heroku for online usage, once you’ve done that you can use it live just like I do off my iPad in this video here.
Cheers!