
React Query and React Table are two incredibly dandy libraries to supplement React Development. React Query provides an appropriately opinionated way of approaching data synchronization and React Table makes the most annoying parts of modernizing HTML tables easy.
In this post, I’ll demonstrate one way to combine the two of them together. This post assumes that you are already somewhat familiar with react-query and react-table, but in case you aren’t, I’ll go over some key ideas from both libraries first. Due to how complex React Query and React Table can be on their own, I highly recommend reading their starter docs first.
We will follow along with example code which can be found at github.com/nafeu/react-query-table-sandbox. You can set it up like so:
git clone https://github.com/nafeu/react-query-table-sandbox.git
cd react-query-table-sandbox
npm install
npm start
We will mostly be focusing on the ReactQueryWithTable.jsx file. Let’s get started.
React Query - Key Ideas
One of the main parts of React Query is the useQuery hook. In the TableQuery component from ReactQueryWithTable.jsx, we have the following:
const {
  data: apiResponse,
  isLoading
} = useQuery('discussionGroups', fetchData);
This can be broken down as follows:
discussionGroupsis a key that we use to uniquely identify a query based on it’s context. In this case it is an HTTP request to a REST API. This is necessary for distinguishing and isolating multiple queries that operate under a single QueryClient object and it’s cache.fetchDatais a helper function which performs an API request and returns a promise. We can define this in whichever way is suitable, in this code we useaxios.datais the response object that we receive from our API which we destructure and rename toapiResponseisLoadingis a loading state variable that we can use to inform our UI
Essentially, using this hook lets us connect our API request logic (with some default re-fetching, caching and polling configurations built-in), retrieve our data and utilize helpful loading state variables to construct our UI in an easy to read and predictable fashion.
React Table - Key Ideas
One of the main parts of React Table is also a hook, and it is the useTable hook. We memoize and feed table data into useTable. The hook then returns a plethora of helpers that are responsible for enhancing our default HTML table. The enhancements allow us to easily render our table data as well as implement sorting, filtering, pagination, and much more. Let’s look at the TableLayout component from ReactQueryWithTable.jsx:
const TableLayout = ({
  getTableProps,
  getTableBodyProps,
  headerGroups,
  rows,
  prepareRow,
}) => {
  return (
    <table {...getTableProps()}>
      <thead>
        {headerGroups.map(headerGroup => (
          <tr {...headerGroup.getHeaderGroupProps()}>
            {headerGroup.headers.map(column => (
              <th {...column.getHeaderProps()}>{column.render('Header')}</th>
            ))}
          </tr>
        ))}
      </thead>
      <tbody {...getTableBodyProps()}>
        {rows.map((row, i) => {
          prepareRow(row)
          return (
            <tr {...row.getRowProps()}>
              {row.cells.map(cell => {
                return <td {...cell.getCellProps()}>{cell.render('Cell')}</td>
              })}
            </tr>
          )
        })}
      </tbody>
    </table>
  );
}
This may seem daunting at first, but after you understanding the flow of props from React Table into our component, it’s not that bad. It can be broken down as follows:
getTablePropsretrieves a set of props necessary for the table to utilize the libraries featuresgetTableBodyPropsis similar togetTablePropsbut for thetbodytagheaderGroups(which contains it’s owngetHeaderGroupPropsandgetHeaderPropshelper functions) is responsible for all library features around thetheadandtrtagsrowsare the individual rows to be rendered with similar helper methods associated with themprepareRowallows us to lazily prepare a row for rendering
In simpler terms, we use these helpers returned to us from the useTable hook to inject all of the correct props into our <table> tag and in doing so, can utilize all of React Table’s incredible features.
Understanding Our Mock Data
In the example code, I prepared a mock api which returns data for an imaginary software dev discussion group website. The data is formatted like so:
[
  {
    "id": 1,
    "name": "How to use react-table in reporting dashboard",
    "active": 40,
    "status": "locked",
    "upvotes": 30
  },
  {
    "id": 2,
    "name": "How to use react-query for BI solution",
    "active": 31,
    "status": "resolved",
    "upvotes": 39
  }
  ...
]
Which should generate a table in our UI like so:
| Topic | Active Members | Status | Upvotes |
|---|---|---|---|
| How to use react-table in reporting dashboard | 40 | locked | 30 |
| How to use react-query for BI solution | 31 | resolved | 39 |
| … | … | … | … |
The interesting part about our mock API is that it is dynamic. Every time you send an api request to localhost:8000/api it sends an updated payload. This is meant to simulate a real world scenario where people are actively posting on discussion groups, opening new topics and resolving issues. This is also to help us see how React Query handles dynamic changes in our table without any additional configuration.
In our ReactQueryWithTable.jsx file, we define a function fetchData which sends requests to this API as follows:
const fetchData = () => axios.get(`http://localhost:8000/api`);
A Proposal For Structuring React Query with React Table
ReactQueryWithTable.jsx is structured into three main components:
TableQuery, which accesses the QueryClient from React Query and handles our data synchronization logicTableInstance, which memoizes our table data and uses theuseTablehook from React TableTableLayout, which takes all of the helpers provided to us by theuseTablehook, connects them with the necessary JSX (markup) and renders our final table.
This separation works in sequence:
TableQuery
  -> handles query logic (React Query)
  -> prepares table data as a prop
  -> returns TableInstance

TableInstance
  -> memoizes data
  -> initiates table instance (React Table)
  -> prepares table instance props
  -> returns TableLayout

TableLayout
  -> utilizes table instance helpers (passed as props)
  -> injects props into elements
  -> renders table
The TableQuery Component
const TableQuery = () => {
  const queryClient = useQueryClient();

  const [tableData, setTableData] = useState(null);

  const { data: apiResponse, isLoading } = useQuery('discussionGroups', fetchData);

  useEffect(() => {
    setTableData(apiResponse?.data);
  }, [apiResponse])

  if (isLoading || !tableData) {
    return <div>Loading...</div>
  }

  return (
    <TableInstance tableData={tableData}/>
  );
}
First we connect to our queryClient using the useQueryClient hook. Then we declare a state variable tableData and its associated setter using the useState hook. This sets the stage for us to work with our api retrieved table data later on. We then utilize the useQuery hook as explained earlier and followup with the following:
useEffect(() => {
  setTableData(apiResponse?.data);
}, [apiResponse])
This will set our tableData with the appropriate API response once it has been retrieved within useQuery.
Since we also have access to the isLoading loading state variable, we can use that to determine what our component should render while we wait on our data. In this instance we just show Loading... on screen.
Now that we have populated our tableData, we pass it as a prop into the next component in our sequence, the TableInstance component.
The TableInstance Component
const TableInstance = ({ tableData }) => {
  const [columns, data] = useMemo(
    () => {
      const columns = [
        {
          Header: 'Topic',
          accessor: 'name'
        },
        {
          Header: 'Active Members',
          accessor: 'active'
        },
        {
          Header: 'Status',
          accessor: 'status'
        },
        {
          Header: 'Upvotes',
          accessor: 'upvotes'
        }
      ];
      return [columns, tableData];
    },
    [tableData]
  );

  const tableInstance = useTable({ columns, data });

  return (
    <TableLayout {...tableInstance} />
  );
}
With access to our tableData, we create and array-destructure two new variables called columns and data. These are responsible for defining our table columns and how they access their associated data.
Columns can be formatted as a collection (or a nested collection) where we use Header as the label for a table header and accessor to instruct React Table on which key to pick the correct value from out of the data.
Our data variable is also structured as a collection (array of objects) and it contains the raw table data as returned from our API.
We then use columns and data to instantiate a tableInstance with the useTable hook:
const tableInstance = useTable({ columns, data });
This contains all of the helpers we need to beef up our boring old regular HTML table. It also contains our tableData but formatted in a way that React Table can understand and work with. We then spread all of the properties of the tableInstance as props into the TableLayout component and move forward from there.
The TableLayout component was actually one of the first things we explained in this post. As you can see, by breaking down our components into a query layer, data processing layer and render layer, we can effectively prepare our table data for display.
The Result
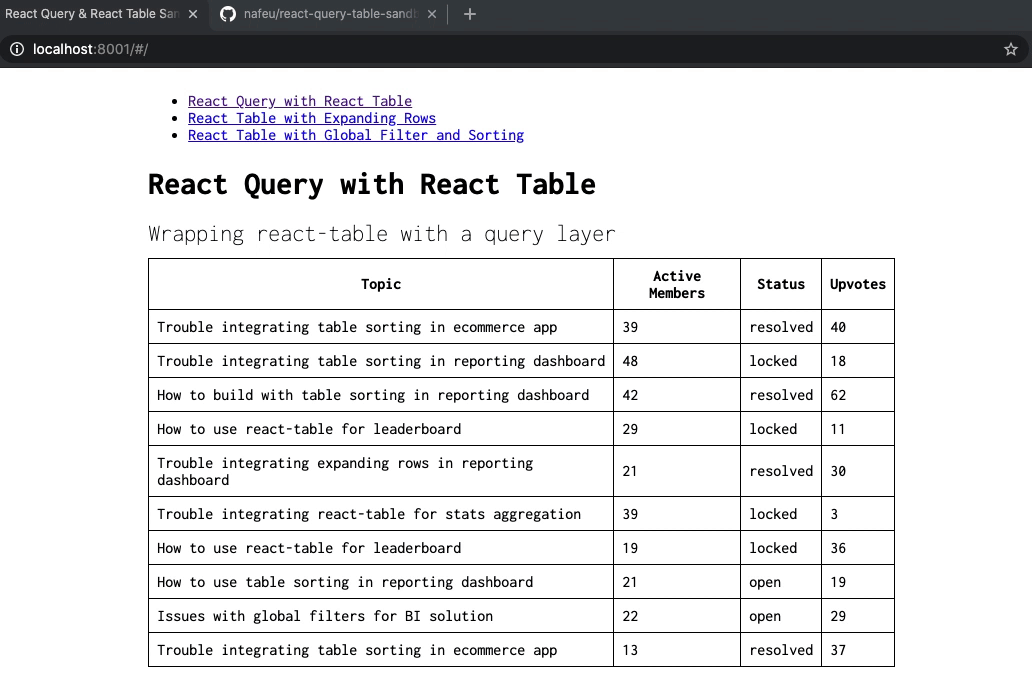
As you can see, we have loading state, we have our data formatted exactly how we want, and React Query even re-fetches data when we leave the page and come back. I hope this tutorial has helped.
Happy Coding!